
Dry stone Retaining walls
Using dry-stone walls to retain terraces in a sloping garden
I have an opportunity for a self employed landscape gardener to take on leads in Bristol, Weston super mare, North Somerset and Somerset areas. information
The Dry-stone method of building retaining walls to hold back soil when terracing a slope has been used for thousands of years.
- Almost all early retaining walls were built this way using stacked stone without any mortar to hold the retaining wall together.
- Instead of mortar the walls were held together by the weight of stone and because the stones were matched and fitted together in such a way that as they settled over time they became stronger and more closely bound.
Three very important rules/measurements when designing a dry-stone retaining wall
- The retaining wall should lean back at least 2 inches per foot of rise, this will provide greater stability.
- When calculating the width of the foundation (bottom of the wall), this should be at least half the wall's height and angled so as to get the lean into the slope.
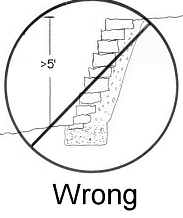
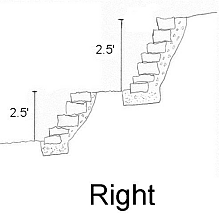
- Height. The higher the wall the greater the risk of collapse. For DIY 3 ft is about the maximum height. More about the forces behind the wall further down.
The stages involved in constructing a dry-stone retaining wall are outlined further down on this page.....
When building retaining walls to retain soil, bear in mind that the wall needs to be able to withstand gravity and frost, this will effect all retaining walls so the retaining wall will need to be constructed strong enough to offset the pushing force of the soil it's holding back.
A single cubic foot of wet soil can weigh up to 100 pounds. With dry stonewalls (described further down) the large stones have a lot of surface area touching one another and can resist this pressure better and survive because the friction of the stones rubbing against one another works against the pushing force exerted by the soil.
Retaining walls built about 3-feet high are fairly safe and easy to construct as the force of gravity against them is not too great. You counteract this force on the wall by building the wall so it leans back and is not perfectly plumb. This offsets the centre of gravity of the stonewall, making it stronger.
Building a dry stone retaining wall.
It's difficult to learn the practical skills from a webpage, but these tips (providing you have the time to practice and experiment) should help as you build your own dry stonewall in the garden. If it all falls down, providing it's not yet retaining anything, all you will have lost is time. You will still have the stone to try again and maybe again. Or to call in a craftsman to build it for you.
Dry stone is more durable than breeze blocks, pre-formed concrete stacking stones and even cropped and cemented natural stone, because it doesn't contain mortar that will crack and won't ever need pointing or rendering.
Dry stone retaining walls look better too, especially in a natural setting like a cottage garden. If you are sourcing the stone locally and not transporting it halfway round the world it also becomes the most sustainable and Eco friendly way to retain soil and terrace your garden.
When building a retaining wall to hold back earth, bear in mind the wall needs to be able to withstand gravity and frost, this effect's all retaining walls. You will need to build the retaining wall strong enough to offset the pushing force of the soil it's holding back. A single cubic foot of wet soil can weigh up to 100 pounds. Large stones that have a lot of surface area touching one another survive because the friction of the stones rubbing against one another works against the pushing force exerted by the soil.
Retaining walls built about 3-feet high are fairly easy to construct as the force of gravity against them is not too great. You counteract this force on the dry stonewall by building the wall so it leans back and is not perfectly plumb. This offsets the centre of gravity of the wall, making it less likely to topple over.
A dry-stone wall is made by stacking stones without using wet mortar (cement) . Dry-stone walls are strong and attractive and can last hundreds of years. Let's look at how they work.
Dry stonewalls are mainly built as fencing to keep animals in, to mark out a garden and for terracing sloping gardens. The maximum safe height should be no higher than 3.5–5 ft. Higher dry stonewalls are possible, but you should consult an expert.
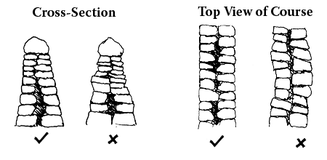
Using the correct stones, packing them tightly together and getting the basic design right (wide at the bottom narrowing to the top and leaning back into ground it is holding back) you can make a really strong natural stone wall that's completely self-supporting, also providing habitat for mosses and lichens and insects.
Gabion baskets make building a retaining wall simple
- HIGH QUALITY & DURABLE - Strong steel wire cage - 4 mm wire, zinc coated & galvanised. Extra robust and corrosion resistant: Lovely garden planter, stone bench, fence or gabion wall.
- MESH SIZE 5 x 10 CM - This gabion cage is ideal for smaller stones. Size is approx. 100 x 50 x 30 cm. 6 wire grids make one metal cage, fastened with 12 spiral connectors.
- CHOOSE YOUR OWN FILLING - Stones for a bench, wood for a screen… glass, bottles, balls or a chunky light display. That's how you make a spiral planter the centrepiece of your garden.
- NO TOOLS REQUIRED - Fence, bench, wall or raised bed? This robust steel gabion is easy to assemble. Just attach the base- and side-mesh with the wire spirals. Your wall basket is ready!
- BARBECUE TABLE OR GARDEN FENCE - A metal gabion for all purposes - You can even use the wall as a trellis for plants. This gabion planter is even stronger with our matching spacers.
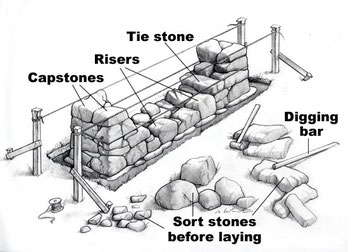
The 10 construction stages in building a dry-stone retaining wall.
- Mark out the area where you will be building your wall with taut lines of string, chalk lines on the ground or wooden stakes.
- Once you start building You might find you will need a combination of all three to get the shape and lean right.
- Measure the size of the planned wall and order the stone. You will need large, medium, and small flat stones. The large stones are probably the most important as the wall can be no wider than the longest stones. Stones should be as flat as possible (round stones won't work). If you can, source stone that has come from a wall that is being dismantled, that way you should end up with a good mix of sizes.
- Clear and level the ground to prepare the foundation, the foundation is the material the wall is built on.
- Foundation for stonewalls. Dig out a six inch deep trench that is as wide as the base of the planned wall and fill with a bed of crushed stone or gravel and compact it with a wacker plate or by stamping over it. Angle the surface so that it inclines back slightly into the slope (2 inches for every 1 foot of height) for greater stability.
- Sort out the stones into different sizes, you should have piles of large (foundation, tie-stones and cap-stones) , medium (risers), and small stones (fillers). The large stones (Tie stones) are the most important as the wall can be no wider than the longest stones. So make sure you have enough. (as the wall gets higher and narrows you will use shorter stones so use the longest stones first)
- Laying the Footings (Foundation Stones) The footings are the stones that make up the bottom layer of stone upon which the rest of the wall sits. The Foundation Stones are the largest stones in the wall and determine the size of the wall.
- Laying the stones. Place the stones in layers consisting of tightly packed stones with a mixture of a few large stones (called tie-stones) running lengthwise into the wall (that is, with their longest edge spanning the width of the wall) with smaller stones packed in between them. Leave as few gaps as possible, the stones in each layer should look like tightly interconnected jigsaw pieces. As you place each stone, check that there is as little wobble as possible. To counteract any wobbling use small, flat rocks as "shims." If you need to, break off stone fragments from larger stones using a mason's hammer.
- Finish off each horizontal layer before moving up to the next one. It is very important to arrange the large stones so they bridge the gaps in the layer below, (Make sure one stone covers two or, two stones cover one in the layer below) ensuring the gaps in successive layers don't line up creating fault-lines where your wall will be much more likely to collapse.
- Capstones. When you have almost reached the final height place the capstones on top. "Capstones" are large flat stones, they help hold the stones under them in place and provide a finished look to the wall and can be formed to make a seat.
What are the main factors causing retaining walls to collapse
- High dry-stone walls are at most risk of collapsing. It is important to be aware that as the retaining wall height increases, the force trying to topple the wall increases by a large factor. For example, if you double the height of a wall, the tipping force can increase by a factor of three or four times.
- Soil expansion. Frozen soil expands as it freezes and can seriously damage retaining walls. So in areas where frost is likely this is minimised by back-filling the wall with gravel. The soil and area itself needs to be well drained so that water can't build up behind the wall. If it's not possible to drain the water away from the wall because the slope in the garden behind the wall is to severe, the water can be drained through the wall by installing weep holes at the base of the wall. Depending what is built under the wall, you then may have to think about where this water is going to be drained to. Garden Drainage information can be found on my garden drainage page.
Writing your first book or novel? This new website provides advice and tips to help write, edit, publish, market and promote it https://www.faircop.com/