
How to make a clay pond
How to make a clay pond using puddling clay.
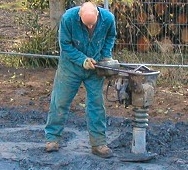
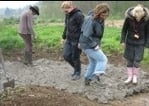
Puddling clay used to be carried out by herding sheep or cattle backwards and forwards over the clay. These days asking friends and school children dressed up in Wellington boots and old clothes to help trample the clay is more likely. Kids enjoy puddling the clay learning an almost forgotten skill. Another way to puddle clay is to drive a digger, tractor or run a Wacker plate over the clay. Either way it's a fun and enjoyable and Eco-friendly way to build a pond.
Building a pond in clay soil
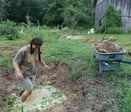
If you are lucky and the hole you are digging is in clay there won't be to much puddling to do. Providing the clay is suitable (I have explained how to test the suitability below) it's just a case of digging down and around until you have dug out a pond. This can be done by hand with a heavy-duty garden spade or a digger.
The clay being dug out can be used to form banks, the higher the bank the less depth you will need to dig.
If you are digging the pond into a slope. Depending on how high the top bank is going to be, you may need extra clay to raise the bottom edge to end up with a level pond surface.
More about creating a pond in clay soil further down this page.
Building a pond in non clay soil and lining with puddled clay
If your garden soil is loam or sand you can still build a clay lined pond. It is hard work, but environmentally friendly and a much better choice for a wildlife friendly pond than using a plastic or rubber liner. And with basic maintenance will last a lot longer.
A couple of things to consider though, puddled clay needs a firm base.
You can't site the pond too near the edge of a slope where soil may subside. Or on silty or peaty soils that are affected by ground water and movement. This could cause the clay to crack and leak. More information lower on this page.
Clay is a natural product and the traditional method of lining ponds. Clay is still the best and certainly the most Eco friendly material for lining garden wildlife ponds and water features. Clay is spread in layers over the excavation and soaked with water. Each layer is then repeatedly trampled to remove all the air. Puddling is hard work and can be fun, but must be done thoroughly to make a waterproof seal.
With the help of friends or the local school, the kids love it and learn about an almost forgotten skill. It really can be a fun job, but if you want to save time or working alone. Use a tracked digger or a Wacker plate to drive back and forth over the layers of clay to speed the process of puddling up.
Positioning the pond.
A clay pond can be dug almost anywhere in your garden. Except in deep shade or under leafy trees, the roots will make digging difficult, and future root growth will probably breakthrough the clay. If you have kids, safety will be an important consideration as will access and because you will be planting wildlife cover around the pond, visibility should be considered. My article discusses making a pond child proof.
Sourcing suitable clay for puddling
If you are lucky clay may be available cheaply as a waste product from local building sites and ground work. Or more likely and more expensive, from clay producers and most suppliers of aggregates.
The puddling clay I use is sourced locally when I can. Otherwise, I use the supplier of puddling clay used by British Waterways for lining canals, listed later in this article.
The minimum clay content of soil suitable for lining ponds is 60%. I have included a simple way to test for clay below.
How thick does a clay liner need to be.
The clay layer should be at least eight inches thick and applied in layers. Once properly puddled, the clay lining remains waterproof indefinitely, provided it remains underwater. Exposed clay dries out and cracks, so is not suitable for steep streams and waterfalls.
A few important points to consider when lining a pond with puddled clay.
-
The slope of the clay bank should be less than a 30% gradient. This makes it easier to puddle and will prevent the clay and any planting soil shifting downwards.
-
No need to make the ponds deepest point, (preferably the middle) any deeper than three feet. This will make it easier to maintain, trim plants and repair the pond.
-
Puddle the clay thoroughly until all air bubbles have been squeezed out. One way of doing this is to tie a whacker plate' on a rope and let it vibrate down the slope and across the bottom.
-
Keep adding and puddling layers of clay until the clay is at least 20cm (8") thick all over the walls, bank and bottom.
-
Clay that is allowed to dry out when the water level drops through evaporation will crack and leak. A clay lined pond will have to be kept topped up at all times.
Creating a garden wildlife pond in existing clay soil
More about digging out and creating a wildlife pond in existing clay soil.
Best place to position a natural clay pond in a garden.
A pond dug out of Clay can be positioned almost anywhere providing the clay holds water. Try to avoid shady areas and leafy trees because the leaves are a nuisance when they fall and the roots will make digging difficult, and will probably breakthrough the clay.
The site should have enough space to provide a natural area around the bank and edge for land living wildlife and a natural habitat for pond life.
Providing the clay is suitable for puddling it's just a case of digging down and around until you have dug out and shaped a pond. This can be done by hand with a heavy-duty garden spade or a digger.
The clay being dug out can be used to form banks, the higher the bank the less depth you will need to dig.
If you are digging the pond into a slope, suitable surplus clay will be needed to raise the bank at the bottom of the slope to get a level surface.
Keep the slope of clay banks to less than 30% gradient to make any puddling and planting easier and for pond life to be able to get in and out with ease. Also, the pond doesn't need to be any deeper than three feet. This makes planting and future maintenance easier and safer.
The top layer of soil you dig out will probably not contain enough clay particles to make it suitable for puddling and sealing the pond. Store this in an accessible place to spread over the bottom and sides for planting.
Only use the deeper clay being dug up for lining the pond. Once the hole is dug and any clay you have used for patching is in place. It needs to be kept damp or it will dry out and crack, allowing water to seep through.
- Line the whole pond with puddled clay. Having gone this far this would be my preference.
- Or line the pond with a rubber liner instead
It's probably a good Idea to test the suitability of the clay in your garden. Before digging the hole and completing the pond. Different methods of testing clay further down this page.
Do's and don'ts when constructing a clay lined pond
- As with all pond excavations, ensure that you have a level area dug into the ground or on a slope build banks at the lower part of the slope.
- The final depth should be three feet deep at the deepest point.
- The slope of the sides should not be more than 30% to make the puddling process and access for pond life easier.
- The clay should be thoroughly puddled until all air bubbles are squeezed out.
- The clay used should be uniform in consistency and pliable.
- The clay must never be allowed to dry out. Large sheets of plastic can be used to keep the clay damp. If it is not possible to get it all done in one day, do one section completely,
- Where the clay meets the soil, it is inevitable that capillary seepage will set up and leach water from the pond.
- To prevent this, you can set up a 'capillary barrier'. It will also function as insurance for keeping the water level high enough above the clay liner to keep moist. This can be set up before you start by excavating a shallow 15cm deep and wide and 30cm below water level around the top of the pool and filling it with a kneaded ring of clay.
What percentage of clay is needed in soil used for puddling.
The ideal minimum clay content of a soil for a leak-proof pond is 60%.
A simple test to find out the type of soil in a garden.
A simple way to test your garden soil. Is to take a small amount of wet soil in your hand and knead it into a smooth paste. Roll it about between your hands to form a ball.
- If it is sticky and gritty its loam.
- If it easily rolls into a ball and is sticky, workable like Plasticine, stains your skin, can be smoothed and made shiny, and doesn't crumble its clay.
- If it won't roll into a ball and feels gritty then it is sandy soil.
- If it feels slippery and silky it is probably a silty loam.
Test to measure clay content in soil.
Test to find how much clay there is in your soil.
To test your soil, take a sample, let it dry out, then break it up as well as you can before adding it to a container of water. A tall straight-side container (e.g. a spaghetti jar), is best because it’s easy to see the relative amounts of each constituent. Half-fill the container with water, add the soil, then top up with water. Turn it upside down as many times as necessary to get the soil in suspension and then watch the soil settle out.
Most of the larger particles of sand will settle in about 20 minutes, with the fine clay staying in suspension for a long while and any organic matter floating to the surface. Once all the soil has settled, measure the total depth of the soil in the container, plus the amount of organic matter. Then, measure the depth of clay particles (those that are obviously not sand).
To calculate the amount of clay:
1. Divide the depth of clay by the total depth of all the soil and the organic matter.
2. Multiply the answer by 100 to obtain the percentage of clay.
eg. if there’s a total of 10cm of soil and organic matter, of which 2cm is clay, divide 2 by 10 (=0.2), then multiply by 100 (=20) to
obtain the percentage (20%).
A simple test to find the cohesive property, can easily be made. A small quantity of the clay is mixed with water and made into a roll about one inch in diameter and five to ten inches long; and if, on being suspended by one end while wet, it does not break, the cohesive strength is ample.
A test to find the water-retaining properties of clayey soil
- Mix up one cubic yard of the clay you dig up from the hole with water,
- Make it into a pliable mass.
- Make a round hole in the top, large enough to hold a gallon of water.
- Fill with water, and cover the top.
- Leave for 24 hours; when the cover is removed if it is full, the clay is suitable for making or lining a clay pond.
"I've started digging a pond on heavy clay soil and have now dug down to two foot at the deepest. The problem is it keeps filling up with water which then won't drain away. I emptied 20 litres last night and 20 more today.
We've had heavy rain, but obviously the water's much deeper than that. It's on a slope of about half a foot. Do you think the water is coming down from the surrounding area?
My Mum thinks I've reached the water table, but it didn't fill with water as I was digging.
I'm worried about how I'm going to line it when it's so wet and whether the water will then build up under the liner? Any advice appreciated please." Yea don't line it! sounds like you have got yourself a natural clay pond"

A read for rainy days
In fairy tales, there is always a
Prince Charming and a bad man. Sometimes in real life, Prince Charming is the bad man, or the
bad man turns out to be Prince Charming.
Please be aware, this is not a fairy tale. This book contains references to grooming gangs, sexual abuse, Gaslighting, and punishment of the abusers. Also NON-WOKE scrutiny of British
society.
A dark story of gaslighting, sexual abuse, retribution, and hope. Based on the author's conversations with Willow, a young girl hidden from Society, and with Richard an ex-soldier now working for
a covert agency The Organisation. This book tells how Richard confronts those in authority blocking Willow from the therapy she needs to escape from them and recover, he’s aware of the
consequences. But having ignored evil too often, he’s ready for the risks.
CLICK LINK FOR FREE READ SAMPLE Kindle version Paperback
Writing your first book or novel? This new website provides advice and tips to help write, edit, publish, market and promote it https://www.faircop.com/